
Let's be honest, manually typing out transactions from a PDF bank statement into an Excel sheet is a soul-crushing task. It's slow, tedious, and one tiny typo can throw off your entire budget or financial report. There has to be a better way, right?
Thankfully, there is. You've got a few solid options for getting that data from a locked PDF into a flexible Excel spreadsheet. Your best bet usually comes down to dedicated converter software if you want speed and accuracy. For those who are a bit more tech-savvy and don't mind a learning curve, Excel's built-in Power Query feature is a powerful, free alternative. And of course, for a single, simple statement, you can always fall back on manual copy-pasting.
The right choice really depends on how many statements you're dealing with and how comfortable you are with different software tools.
Why Bother Converting Bank Statements to Excel?
Wrestling with PDF bank statements is more than just an annoyance; it's a minefield of potential errors and wasted time. Manual data entry is a recipe for mistakes that can have real-world consequences for your budget, tax filings, or business analysis. Learning how to properly convert bank statements to Excel is about moving past these headaches for good.
This isn't just about a new workflow—it's about getting your time back and trusting your numbers. Instead of losing hours to mind-numbing transcription, you can turn a mountain of documents into a perfectly organized and analyzable dataset in minutes. This is a game-changer for small business owners tracking expenses, accountants juggling multiple clients, or anyone who takes their personal finance seriously.
Save Hours and Eliminate Errors
The most immediate win is the sheer amount of time you save. A task that could easily take hours of manual typing can be wrapped up in less than five minutes with the right automation. This isn't just a small convenience; it’s a fundamental upgrade to how you handle your financial data.
But speed is only half the story. Automated conversion drastically improves your data's accuracy. We’ve all been there—one mistyped digit that throws off an entire month's reconciliation and sends you on a frustrating hunt for the error.
By taking manual transcription out of the picture, you virtually eliminate the risk of typos and transposed numbers. This means your financial reports, tax calculations, and budget analyses are built on a solid foundation of clean, reliable data.
That kind of accuracy gives you incredible peace of mind, especially when deadlines are looming for tax season or you're preparing financials for stakeholders.
Unlock Deeper Financial Insights
Once your transaction data is neatly organized in Excel, it transforms from a static list into a powerful analytical tool. You're no longer just staring at a page of numbers. Suddenly, you can:
- Sort and filter with ease: Instantly find a specific payment, see everything you paid to one vendor, or isolate all your income sources for the quarter.
- Build powerful Pivot Tables: Summarize spending by category, track your income trends over several months, and get a bird's-eye view of your financial health.
- Create compelling visualizations: Use charts and graphs to spot spending patterns and trends that are nearly impossible to see in rows of raw data.
This level of insight is simply out of reach when your financial history is trapped inside a PDF. Converting your statements unlocks their true value, turning them into a dynamic resource for making smarter, more informed financial decisions.
Choosing the Right Conversion Method for You

When you need to get your bank statement data into Excel, there’s no single "best" way to do it. The right approach really depends on your situation—how many statements you're dealing with, your budget, and how tech-savvy you are. It all comes down to finding the right balance between speed, cost, and how much control you want over the process.
Think about it: a small business owner who needs to process a dozen statements a month has completely different needs than a freelance accountant juggling records for a whole roster of clients. Let’s walk through the main options so you can figure out what makes the most sense for your workflow.
Dedicated Converter Software
If you're after speed, accuracy, and some powerful extra features, dedicated converter software is probably your best bet. These tools are specifically designed to understand the often-tricky layouts of bank statement PDFs. They use Optical Character Recognition (OCR) to grab the data and export it into a clean, organized spreadsheet that’s ready to go. This is the ideal route if you have a high volume of statements where manual entry just isn't realistic.
Many of the top tools now even use AI to automatically categorize your transactions, which can save you a ton of time during analysis. Being able to batch-process an entire quarter's worth of statements at once is a massive help, especially when tax season rolls around. You'll find a variety of pricing models out there, from monthly subscriptions to more flexible pay-as-you-go plans.
A quick word of advice: your financial data is highly sensitive. When you're looking at different tools, make sure you choose a provider that’s upfront about their security. Look for things like data encryption and compliance with standards like SOC 2 or GDPR.
The market has some great options. Bank Statement Converter and Nanonets are two popular choices that offer plans starting around $15 per month and get high marks from users for their speed and reliability. For a closer look, you might want to check out this full comparison of bank statement converters.
Built-in Excel Tools Like Power Query
Maybe you’d rather not deal with third-party software and prefer to stick with what you already have. If that’s the case, Excel’s own Power Query is a fantastic tool. It’s powerful, free, and already built into modern versions of Excel—you'll typically find it under the "Get & Transform Data" tab.
Power Query puts you in the driver's seat. You can connect it directly to your PDF file, then clean and shape the data before it ever lands in your spreadsheet. This means you can remove weird columns, fix formatting, and get everything looking perfect from the start.
I’ll be honest, there’s a bit of a learning curve compared to a simple drag-and-drop converter. But for anyone who works with financial data regularly, learning Power Query is a skill that will pay off time and time again.
Manual Copy and Paste
And then there's the old-fashioned way: just copy and paste. If you only have one simple, digitally-generated PDF to tackle as a one-off task, this might do the trick. It’s free and you don’t need any extra software.
Be warned, though—this method gets messy fast. Bank statements with complex tables or multiple columns often turn into a jumbled mess when pasted into Excel. You can easily spend more time cleaning up the data than it would have taken to use a proper tool. This approach is really only practical for the smallest, most infrequent jobs.
Using a Dedicated Converter for Fast Results
When you need to get your bank statement data into Excel quickly and without errors, a dedicated software tool is your best bet. I've found that these converters are specifically designed to understand the often-weird layouts of financial documents, which makes them the clear choice for anyone who values their time.
Honestly, this approach turns what could be a multi-hour headache of manual data entry into a task you can knock out in just a few minutes. Think about it: you can go from a messy folder of PDFs to a clean, organized Excel sheet in less time than it takes to make coffee. That's the real power of using the right tool for the job.
Getting Started With a Converter
The setup is usually a breeze. Most of these tools are web-based, so after a quick sign-up, you’ll find yourself looking at a simple dashboard where you can start uploading your files.
A huge plus is that they can handle both digital and scanned PDFs. If your statements are downloaded straight from your bank's website, just drag and drop them in. If you're working with old paper statements, a quick scan is all it takes. The software's built-in Optical Character Recognition (OCR) technology does the heavy lifting, reading the text right off the scanned image.
This visual shows you exactly how these tools pull data from a PDF.
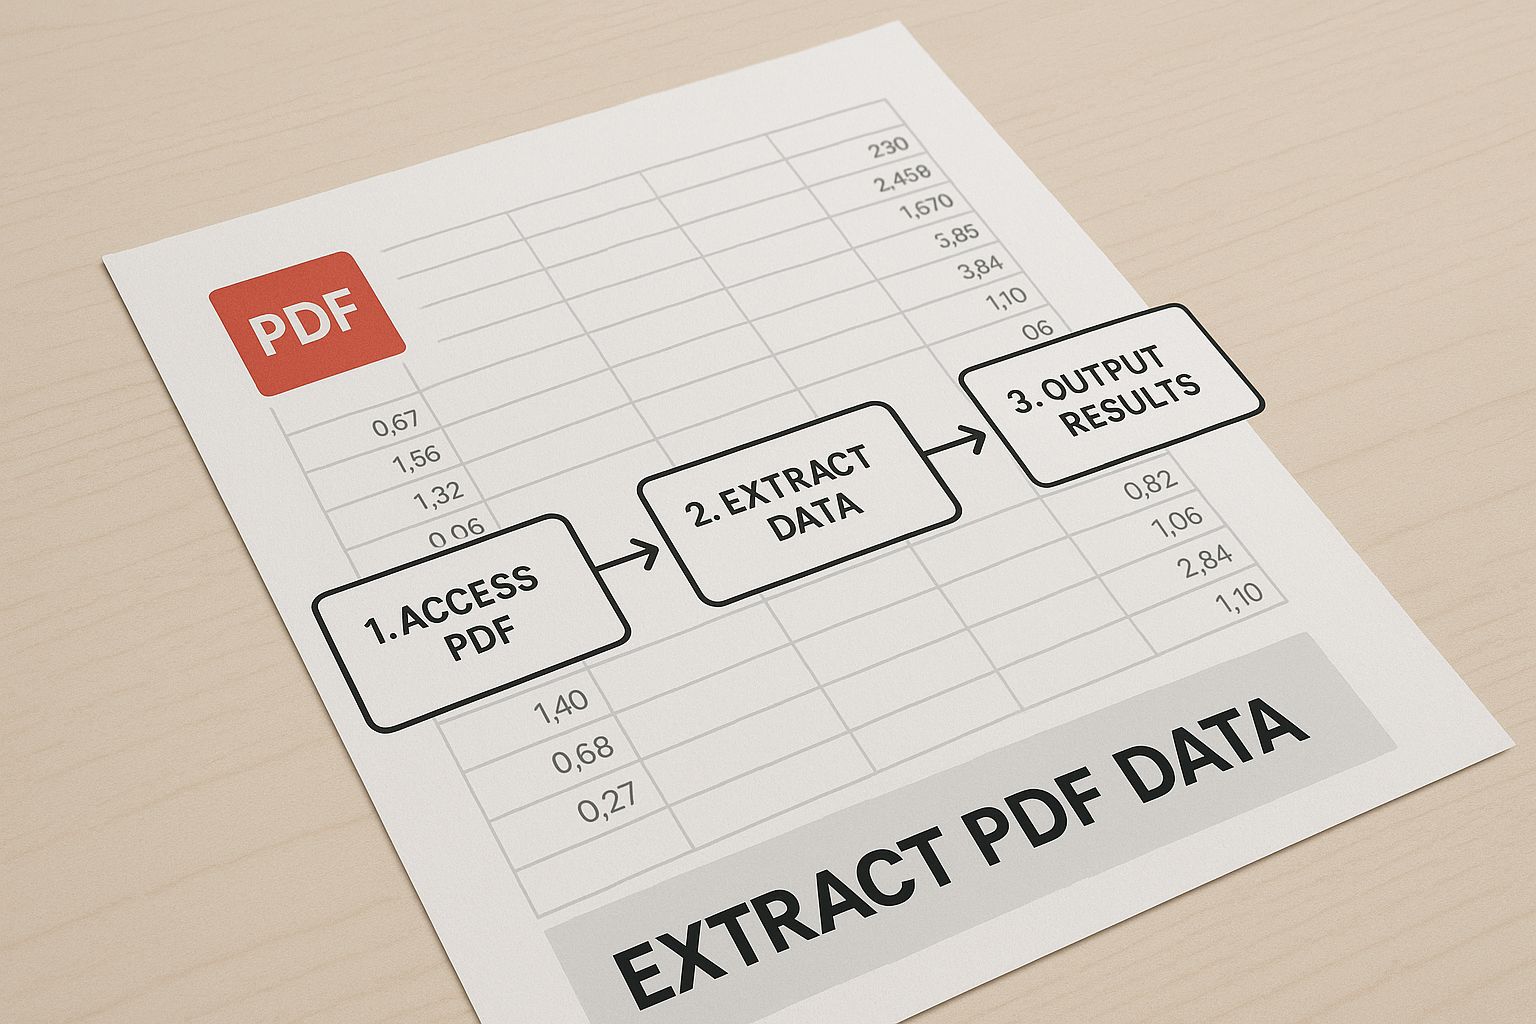
It's a great illustration of how a static, locked-down PDF becomes structured, usable data—which is precisely why these converters are so valuable.
From Upload to Clean Data
Once your statements are in the system, the real magic happens. The best bank statement converters have gotten incredibly smart. For example, some top-tier tools I've seen, like DocuClipper, can boast an accuracy rate of 99.6% when pulling data from any bank or credit card statement. That’s a massive improvement over manual entry and practically eliminates costly mistakes. These tools can also be up to 80% faster than trying to do it all by hand.
The converter automatically finds and extracts all the important stuff:
- Transaction dates and descriptions
- Debit and credit amounts
- Opening and closing balances
- Statement periods and account numbers
What’s really helpful is that many platforms also run an automatic reconciliation check. They'll confirm that the individual transactions add up correctly to match the summary on the statement, giving you that extra bit of confidence that the numbers are solid.
My Pro Tip: If you have a big pile of statements, always use the batch processing feature. Being able to upload a whole year's worth of documents at once is a game-changer and a key reason to use a dedicated tool in the first place.
Exporting Your Final Spreadsheet
After the conversion is done, the last step is simply to download your data. This is where you can pick the format that works for you. You can get a perfectly formatted Excel (XLSX) file, a simple CSV file that works with almost anything, or even a file formatted specifically for accounting software like QuickBooks.
You also get control over the final output. Most tools let you customize the columns you want to see—like date, description, debit, credit, and the running balance. This flexibility means the spreadsheet is set up exactly how you need it for your analysis or bookkeeping. If you're weighing your options, our guide on choosing an online PDF to Excel converter can help you find the right fit.
Want to Keep It All in Excel? Try Power Query.
If you're like me and prefer to keep your financial data on your own machine without relying on third-party software, Excel has a fantastic, built-in feature that’s perfect for this task. It’s called Power Query, and it's a data transformation powerhouse that can pull information directly from your PDF bank statements.
This method essentially turns Excel into its own conversion tool. You can connect to a PDF, clean up the messy data, and load it into a worksheet—all without ever leaving the program. It does take a bit more hands-on effort than a dedicated converter, but honestly, learning this skill is a massive time-saver for anyone who regularly deals with financial data.
Making the Connection to Your PDF
First things first, you need to tell Excel where to find your bank statement. You'll find the Power Query tools on the Data tab in the main ribbon, tucked into the "Get & Transform Data" group.
From there, the path is: Get Data > From File > From PDF. This will pop open a file browser. Just navigate to where you saved your bank statement PDF and select it.
Excel will chew on the file for a moment and then present you with a preview of the tables it found inside. You’ll probably see a few different tables listed, since banks love to break up statements into separate sections. Your mission is to identify the one that holds your core transaction data—the list of dates, descriptions, and amounts. Once you've found it, select that table and click Transform Data to launch the Power Query Editor.
The Cleanup Crew: Power Query Editor
This is where the magic happens. The Power Query Editor is a separate window designed specifically for wrangling messy data into shape before it ever touches your spreadsheet. When you first see your imported data, don't panic. It's almost guaranteed to look like a jumble, with extra columns, weird text, and incorrect formatting.
Here are a few of the most common cleanup tasks you’ll likely encounter:
- Ditching Extra Rows: Your import will probably grab header and footer text from the PDF. The "Remove Rows" function lets you get rid of them with a couple of clicks.
- Splitting Up Columns: It's common for dates and transaction descriptions to be mashed together in one column. Use the "Split Column" tool to break them into separate, usable fields.
- Setting the Right Data Types: You need to tell Excel that your numbers are actually numbers. Select your transaction amount columns and change their data type to Currency. Do the same for your date column, making sure it’s set to the Date type.
The best part about Power Query is how it tracks every single change you make in a list called "Applied Steps." If you mess up, you don't have to start over. You just delete that specific step. This makes the whole cleanup process incredibly forgiving and repeatable.
Microsoft’s Power Query is a game-changer, turning tedious manual data entry into an automated, repeatable process. Once you set up these steps, you can just refresh the query next month with a new statement. You can dive deeper into these kinds of advanced data extraction techniques on formx.ai.
After your data looks clean and organized in the editor, just hit Close & Load. Power Query will drop the perfectly formatted data into a new worksheet as a table, all set for you to start analyzing.
Troubleshooting Common Conversion Problems
Even when you're using a top-notch converter, you can still hit a few snags turning bank statements into clean Excel files. Don't sweat it—most of these hiccups are common and, more importantly, completely fixable. Knowing what to look for and how to handle it is the key to getting reliable data every single time.
Nine times out of ten, the biggest troublemaker is a poor-quality source file. If you're starting with a scanned paper statement, a blurry, crooked, or low-resolution image will send the Optical Character Recognition (OCR) technology into a tailspin. This is when you see jumbled text, numbers mistaken for letters (like a "0" becoming an "O"), or entire transactions simply disappearing.
Fixing OCR and Layout Issues
When OCR errors start cropping up, your first move should always be to go back to the source. Try re-scanning the document at a higher resolution; from my experience, 300 DPI is the sweet spot. Make sure the page is perfectly flat and lit evenly to get rid of any shadows or distortions that can confuse the software.
Another headache I see all the time comes from complex statement layouts. Some banks cram multiple tables onto a single page. A basic converter might get confused and try to merge data from a summary box with your main transaction list, creating a mess of misplaced columns and wrong entries.
The best defense here is using the data preview feature. Before you finalize the export, take a moment to confirm that the software has correctly identified the main transaction table and is ignoring any other summary boxes or fluff on the page.
If you find yourself wrestling with these issues constantly, it might be a sign that your current tool isn't up to the task. More advanced converters are specifically trained on thousands of different bank statement formats, so they're much smarter about navigating these tricky layouts right out of the box.
Correcting Data and Formatting Glitches
Even after a successful extraction, you'll probably need to do a little tidying up in Excel. One of the most common "last mile" problems is dealing with inconsistent data formats, especially with dates and numbers.
Once your data is in the spreadsheet, keep a close eye on these specific areas:
- Date Formats: Are all dates in the same format, like MM/DD/YYYY? Mixed-up formats will completely wreck your ability to sort transactions chronologically.
- Debit and Credit Columns: Double-check that withdrawals and deposits landed in their proper columns. I've seen converters dump all financial figures into a single column, leaving you to manually separate them.
- Text Descriptions: Give the transaction descriptions a quick scan for any obvious OCR blunders. A simple find-and-replace in Excel can clean up recurring mistakes, like a vendor's name being consistently misspelled.
Spending just a few minutes spot-checking these details is a vital final step. To make the entire process smoother from start to finish, using a well-designed spreadsheet can work wonders. You can grab an excellent Excel bank statement template from our site to help keep your final data perfectly organized and ready for analysis.
Frequently Asked Questions
When you start digging into converting bank statements, a few common questions always pop up. It's only natural, especially since we're talking about sensitive financial data. Let's tackle some of the things people ask us most often so you can move forward with confidence.
Is It Safe to Use Online Conversion Tools?
That’s a great question, and the short answer is: it depends on the tool. Your security should always be top of mind. Reputable online converters will use SSL encryption to protect your data as it travels from your computer to their servers. Think of it as a secure, armored tunnel for your information. The best services also follow strict privacy regulations like GDPR.
Still, you have to be your own best advocate. Before you upload a single document, take a minute to read the company's privacy policy. What do they do with your data? How long do they keep it? If you're handling highly sensitive information or client files, your safest bet is always going to be desktop software or Excel’s built-in tools. That way, your documents never even touch the internet.
Can I Convert a Scanned Paper Statement?
You absolutely can, but the success of the conversion hinges entirely on the quality of your scan. This is where a technology called Optical Character Recognition (OCR) comes into play. It’s what allows the software to "read" the text from the image of your statement.
For the best results, forget about taking a quick photo with your phone. Use a proper flatbed scanner and set the resolution to at least 300 DPI (dots per inch). A clean, crisp, and flat scan—free of shadows, wrinkles, or last week's coffee rings—will give the OCR the best possible chance to extract the data accurately.
If you run a conversion and the output is a jumbled mess, the first thing to do is go back and re-scan the document at a higher quality. It often makes all the difference.
What Is the Best Free Method?
If you're looking for the most powerful and secure free option, you don't have to look any further than your own computer. Excel's built-in Power Query feature is a fantastic tool for this. It keeps all your data local and gives you an incredible amount of control, though you should expect a bit of a learning curve to get the hang of it. We break down more options in our complete guide to the best PDF to Excel converter tools.
Free online tools can be fine for a quick, one-off conversion of a non-sensitive document. Just be cautious and aware of the privacy trade-offs. And while the old copy-and-paste method is technically free, the amount of manual reformatting it requires usually makes it more trouble than it's worth for anything but the simplest statements.
Ready to transform your financial workflow? The Bank Statement Convert PDF tool is designed to make converting your bank statements to Excel fast, accurate, and effortless. Get started today!